

![]()
This sequence provides an overview of the solar pool heating system collectors installation process.
 |
The first step in the collector mounting sequence is to get the collectors up to the roof. Once on the roof, the collectors are situated in their proper location. As with other solar applications it's always best, whenever possible, to have the collectors facing south. |
 |
After the collectors have been positioned, the installer then has to connect each individual panel. This is done by connecting the collector headers. Couplings are slipped over the ends of the headers and are firmly attached using stainless steel clamps. Position mouse over picture to see close-up of coupling. |
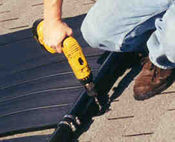 |
Next, the installer attaches the collector mounting clips to the collectors and the roof structure. These clips hold the collector securely to the roof. A typical mounting clip is made of rigid plastic, as in this case, or metal. Position mouse over picture to see close-up of mounting clip. |
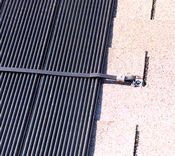 |
Once the collectors have been attached to the roof, the worker then installs strap tie downs and cross straps. The straps span the collectors horizontally to further secure them and provide stability during gusty conditions. The installer follows the manufacturer's recommendation regarding the number of mounting clips and cross straps to use. |
© 2007-2014 University of Central Florida. The Florida Solar Energy Center (FSEC)
is a research institute of the
University of Central Florida.
For more information about FSEC, please contact us or learn more about us.
Find us on Facebook!