

![]()
This page will detail the installation of the collector mounting clip support plate, collector mounting clips, and flat-plate solar collector.
Before starting the installation, the installer verified that the roof was in suitable condition for the mounting of the solar collector. That included ensuring that the shingles were in satisfactory condition and that the sheeting and truss system was structurally adequate to support the collector. In general, there usually is no problem in mounting a solar collector on a conventional roof.
The installer also determined that the solar collector would receive a minimum of six hours of solar radiation during the course of the day. The ideal time for solar collection is 3 hours before and 3 hours after solar noon. It is recommended that installed collectors be facing due south or within 30° to 45° east or west of due south. In regards to the tilt of the collector, the collector should be mounted at an angle ± 15° parallel to the site's latitude.
 |
The installer is locating the trusses that will be used to attach the solar collector mounting brackets. Locating the trusses can be done by either tapping for firmness, identifying them visually at the eaves, or by locating them in the attic. |
 |
After having identified where the trusses are, the installer then makes preparations for the mounting of the collector mounting clips. The collector will then be attached to these mounting clips. |
 |
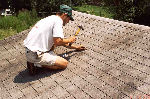
Using a trowel, the installer very carefully lifts the shingle where the mounting clip will be installed. A mounting clip support plate will be installed under the shingle. |
 |
Sealant material is applied to the underside of the mounting clip support plate. The support plate will provide structural support to the shingle when the mounting clip is bolted to the truss member. |
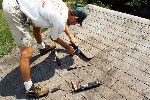 |
The mounting clip support plate is then inserted between the raised shingle. Although not all installers use this support plate, it's use does prevent the shingle from possibly being damaged when the mounting clip bolts are tightened. |
 |
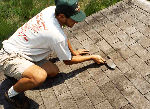
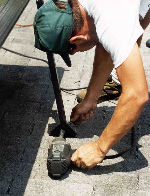
The installer then installs the collector mounting clip by securing a lag bolt through the shingle and support plate and into the identified truss member. Sealing material has been placed between the shingle and the mounting clip. |
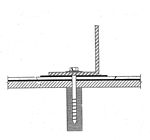 |
As indicated in this illustration, the bolt is lagged directly into the truss member. Collector mounting clips come in various designs and configurations. |
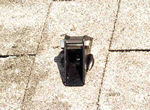 |
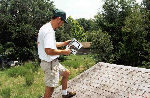
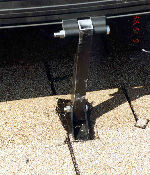
The mounting clip is now attached. Mounting clips will be attached at four locations on the roof for eventual collector mounting attachment. |
 |
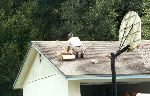
Once the mounting clips are attached, the solar collector is then hoisted onto the roof by the installation crew. In most cases, one installer is installing the collector mounting clips on the roof, while the rest of the crew is busy installing the water heater and other system components near the water heater. Once the clips are installed, the crew then assists the roof installer in mounting the collector. Flat-plate collectors can range in weight from 100 to 150 pounds, thereby requiring more than one individual to place the collector on the roof. |
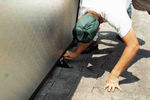 |
Once on the roof, the collector is attached to the mounting clips. Four mounting clips will be used. The location of the clips not only provided adequate support for the collector, but also distributes the weight of the collector at the four mounting locations. |
 |
In the event the collector has to be mounted at an angle, collector supports are installed between the mounting clips and the collector. Although greater tilt provides more solar radiation in the winter and lower tilt more in the summer, as a rule of them, collectors are usually mounted at the site's latitude. This is adequate for year round operation and gives enough leeway so that the collector can be mounted at the same tilt as the roof. This also provides a more aesthetic installation. |
 |
This photograph shows both the roof mounting clip as well as the clip used to attach the collector to the support bracket. Once again, in some cases, the collector is raised to provide a greater tilt. If the collector is mounted parallel to the roof, care must be taken to provide a space between the collector and the roof for debris such as leaves to pass under the collector. |
© 2007-2014 University of Central Florida. The Florida Solar Energy Center (FSEC)
is a research institute of the
University of Central Florida.
For more information about FSEC, please contact us or learn more about us.
Find us on Facebook!